---
title: Customize App Settings (Organization)
description: The App Settings section in FairConsent allows Business users to configure how the platform and mobile app function across their organization.
---
[Skip to content](https://help.fairpicture.org/support/solutions/articles/101000546487#main-content)
English
Show submenu for translations

Open main navigation
Close main navigation
- English
Show submenu for translations
- Contact us
Contact us
How can we help you?
- There are no suggestions because the search field is empty.
1. [Fairpicture Help Center](https://help.fairpicture.org/support?hsLang=en)
2. [FairConsent App and Platform](https://help.fairpicture.org/support/fairconsent-app-and-platform?hsLang=en)
3. [FairConsent Platform](https://help.fairpicture.org/support/fairconsent-app-and-platform?hsLang=en#fairconsent-platform)
# Customize App Settings (Organization)
The **App Settings** section in FairConsent allows Business users to configure how the platform and mobile app function across their organization. Through this section, you can control how consent is collected, what data is captured, how that data is structured and synced with external systems, and how long it is stored. These settings ensure that your workflows align with your organization's operational needs, compliance requirements, and integration setup.
All configurations made in App Settings are reflected directly in the collector app, meaning any changes will immediately impact how collectors gather and manage consent in the field.
N.B.: Only **Owners** and **Admins** have permission to modify these settings, ensuring consistency and preventing unintended changes.
### **A. Consent Configurations**
Configure how consent is collected within the app.
1\. Navigate to App Settings
2\. Consent Configurations
3\. Choose how consent can be obtained:
- Photo
- Signature
- Audio Recording
By default, all three options are enabled. You can adjust these based on your organization's requirements.
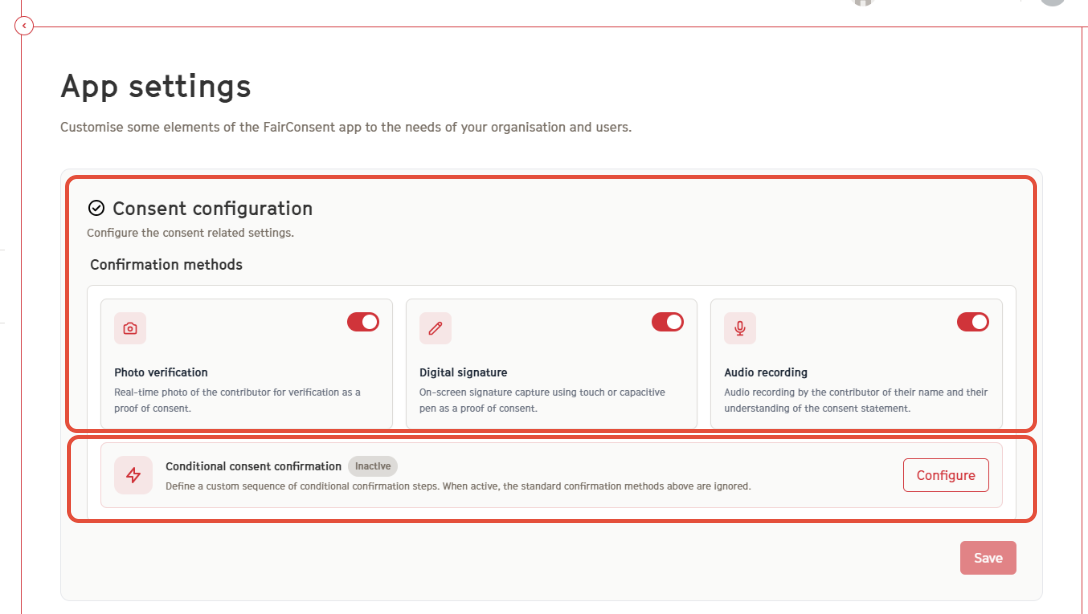
**4. Conditional Consent Confirmation:**
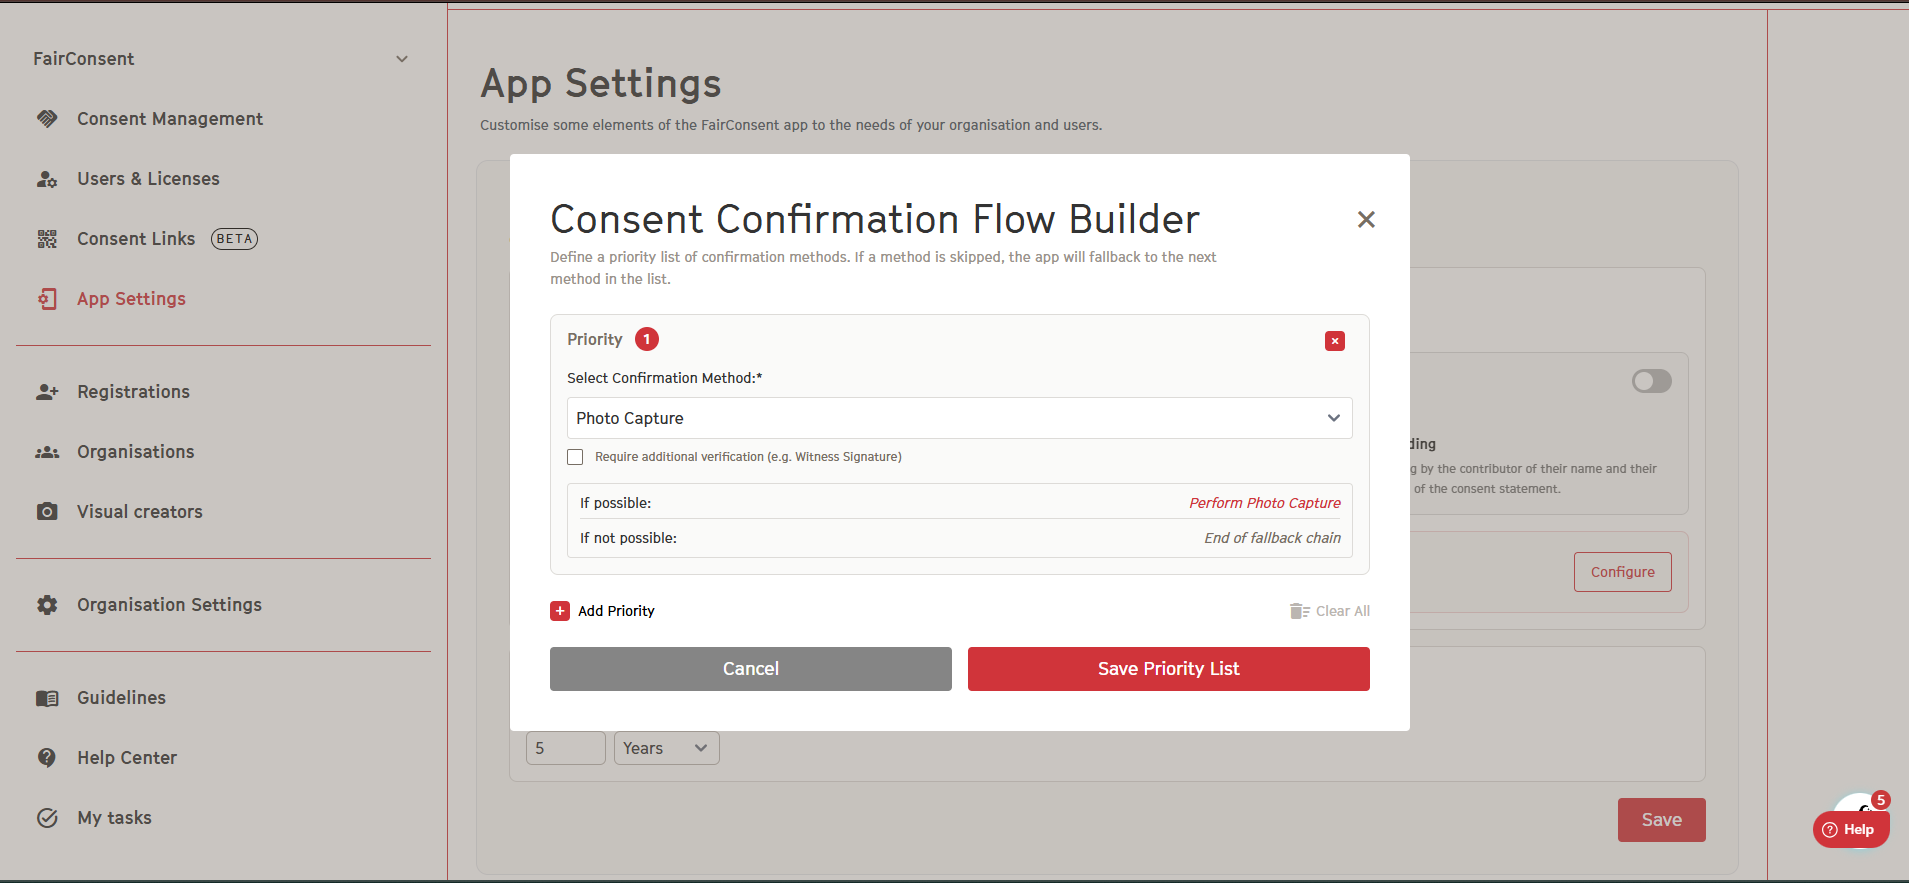
Define a custom priority of conditional confirmation steps. When active, the standard confirmation methods above are ignored.
- Click on configure.
- Add confirmation priority for the three method.
- Optionally click on additional verification for witness as well.
- Save priority list when done.
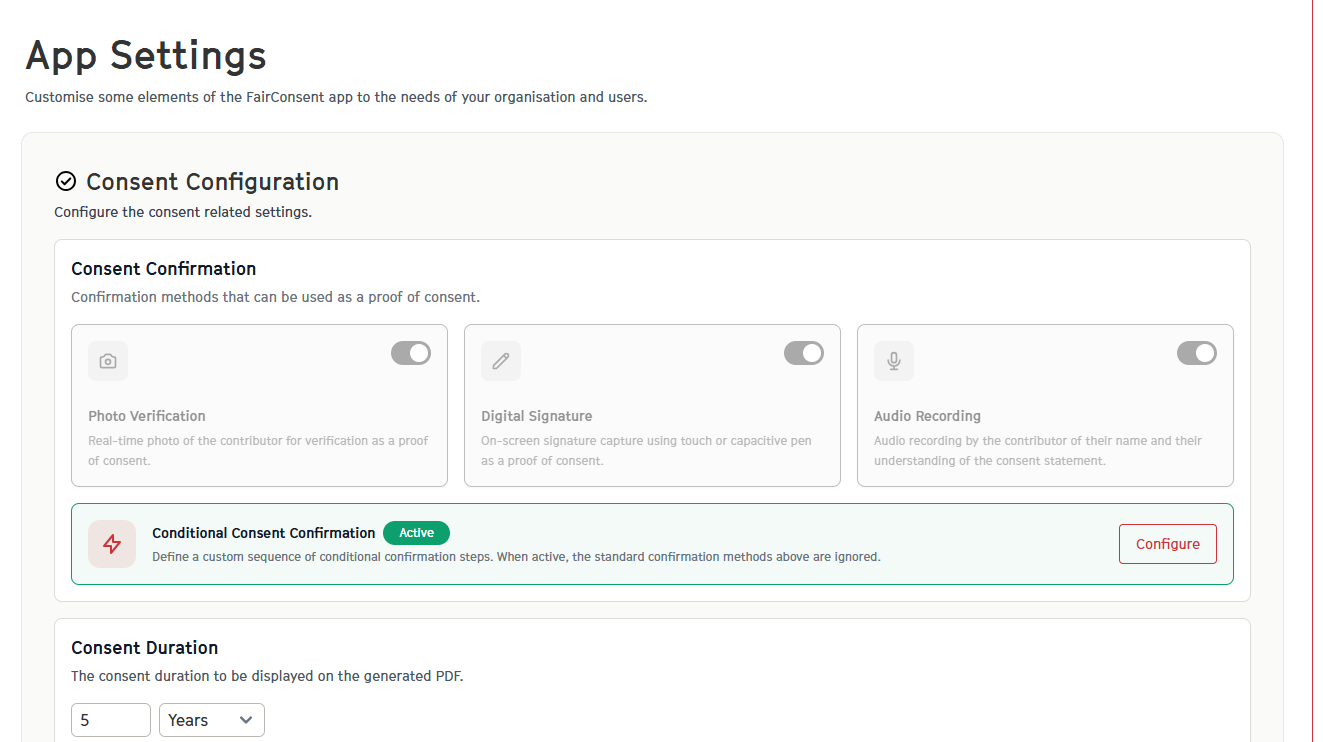
- Then it'll be active and the above consent configuration will be disabled.
### **B. Custom Fields**
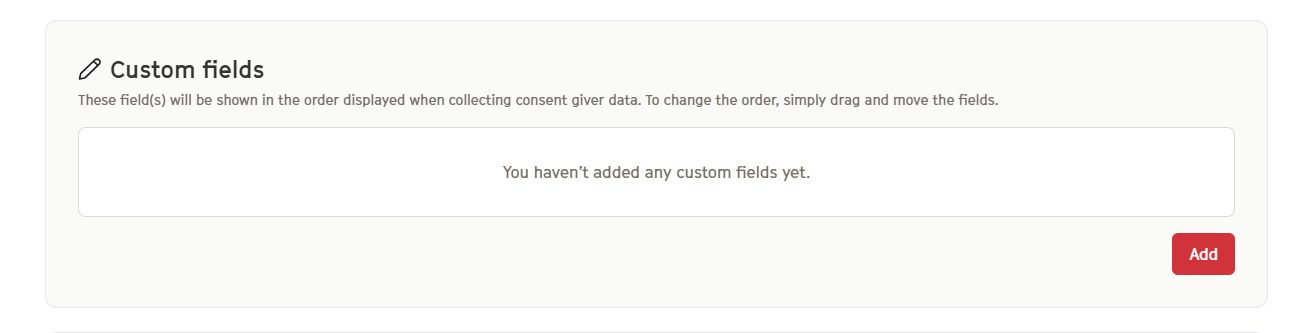
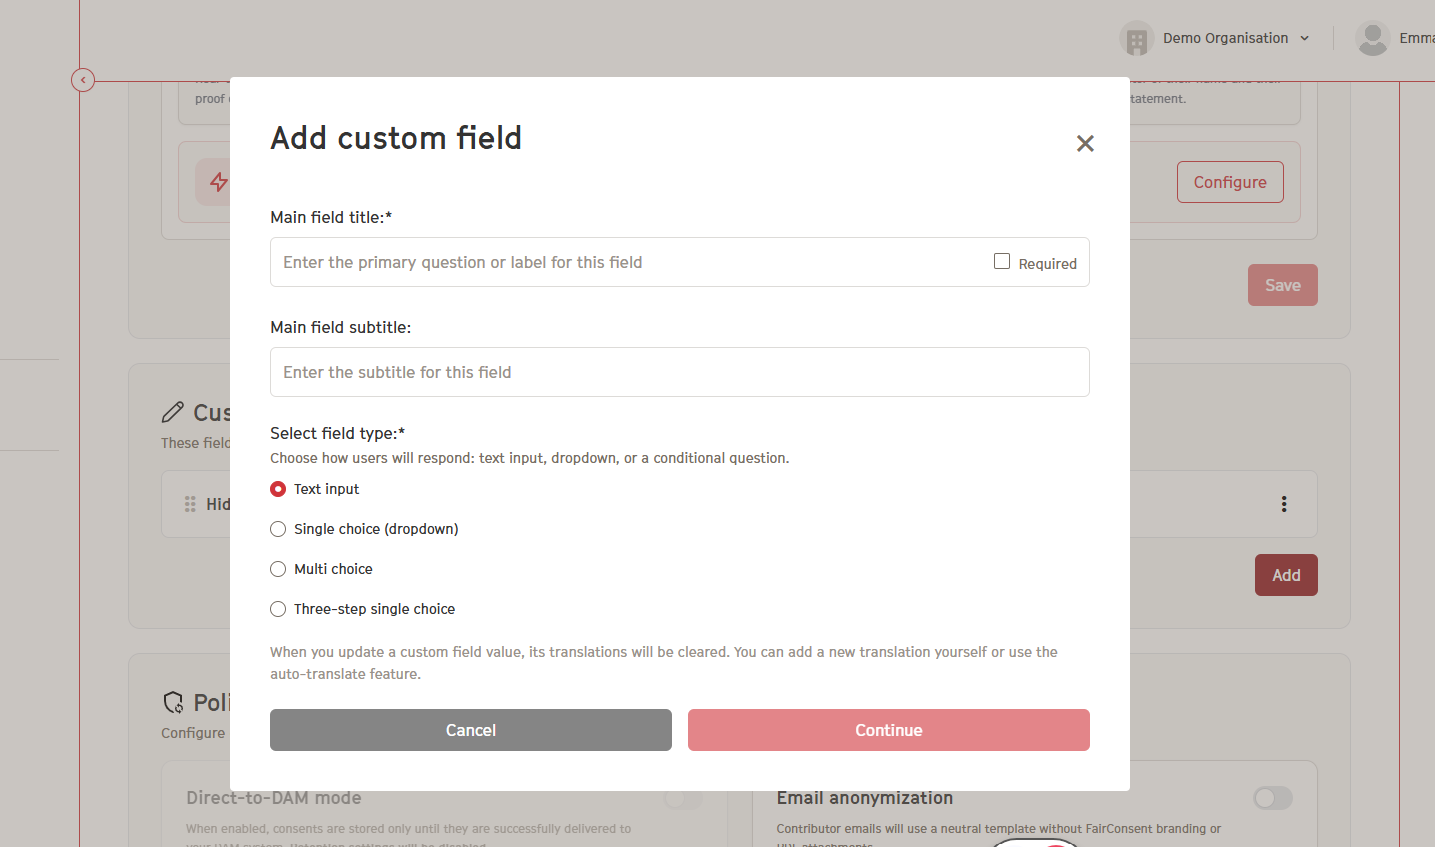
Custom fields allow you to define what data is collected as part of the consent form.
1\. Go to App Settings → Custom Fields , then click **"Add"**
2\. Add a Field Title and Subtitle
3\. Select the Answer Type:
- Text Input
- Single Choice
- Multi Choice
- Three-Step Single Choice
4\. Click Continue to configure translations (if needed)
5\. Click **Save**
Once created, the custom field will appear in the app for collectors to collect this information from the consent giver.
### **C. Metadata Field Mapping**
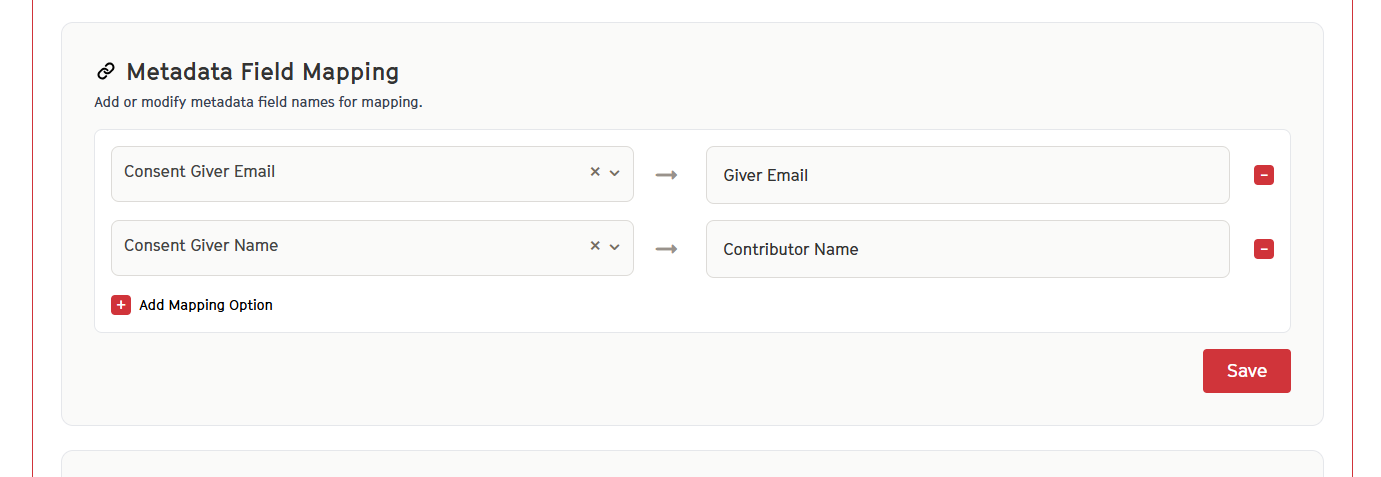
Map FairConsent data fields to your Digital Asset Management (DAM) system to ensure proper metadata synchronization.
1\. Navigate to App Settings → Metadata Field Mapping
2\. Click **"Add Mapping Option"**
3\. Select the required FairConsent metadata field.
4\. Go to your DAM system and copy the corresponding metadata field name.
5\. Paste it into the mapping field in FairConsent.
6\. Click **Save.**
Once configured, uploaded consents will automatically sync with the mapped metadata in your DAM.
Notes: You can find the related articles for all DAMs ***[here](https://help.fairpicture.org/support/fairconsent-app-and-platform?hsLang=en#08-dam-integrations)***
### **D. Policies & permissions**
Control how consent data is stored and managed over time.
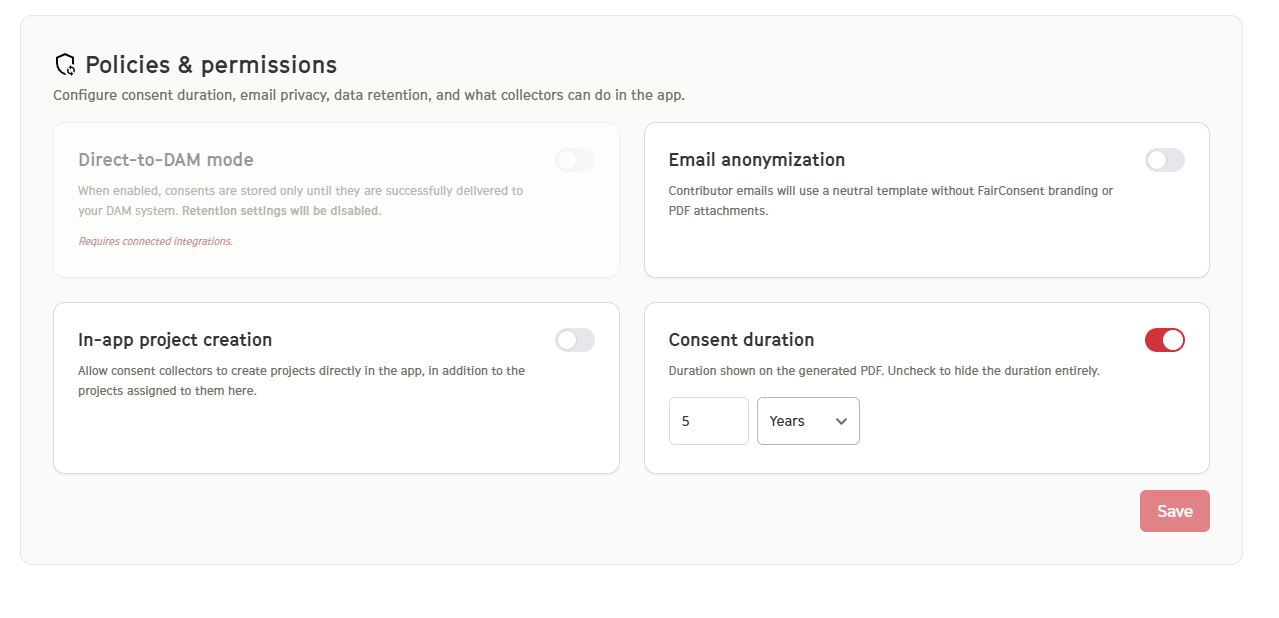
#### **1. Direct-to-DAM Mode**
When enabled:
- Consents are sent directly to your DAM system
- They are not stored on the FairConsent platform
- Automatic Deletion
You can enable automatic deletion of consents from the platform.
#### **2. Email anonymization**
When enabled:
- Contributor emails will use a neutral template without FairConsent branding or PDF attachments.
#### **3. In-app project creation**
When enabled:
- Allow consent collectors to create projects directly in the app, in addition to the projects assigned to them from the platform.
#### **4. Consent duration**
- Specify the duration shown on the generated PDF.
- Uncheck to hide the duration entirely.
#### **Need More Help?**
For any questions or support, reach out to us at [customersupport@fairpicture.org](mailto:customersupport@fairpicture.org)
- [FAQ for Clients](https://help.fairpicture.org/support/faq-for-clients?hsLang=en#main-content)
- [Services](https://help.fairpicture.org/support/faq-for-clients?hsLang=en#services)
- [Prices](https://help.fairpicture.org/support/faq-for-clients?hsLang=en#prices)
- [Starting a project](https://help.fairpicture.org/support/faq-for-clients?hsLang=en#starting-a-project)
- [FAQ in Projects](https://help.fairpicture.org/support/faq-for-clients?hsLang=en#faq-in-projects)
- [Platform Tutorials](https://help.fairpicture.org/support/platform-tutorials?hsLang=en#main-content)
- [Post-production tutorials](https://help.fairpicture.org/support/platform-tutorials?hsLang=en#post-production-tutorials)
- [Platform tutorials](https://help.fairpicture.org/support/platform-tutorials?hsLang=en#platform-tutorials)
- [FAQ for Visual Creators](https://help.fairpicture.org/support/faq-for-visual-creators?hsLang=en#main-content)
- [Rates and Payment](https://help.fairpicture.org/support/faq-for-visual-creators?hsLang=en#rates-and-payment)
- [Getting started on the platform](https://help.fairpicture.org/support/faq-for-visual-creators?hsLang=en#getting-started-on-the-platform)
- [Services](https://help.fairpicture.org/support/faq-for-visual-creators?hsLang=en#services)
- [VC questions](https://help.fairpicture.org/support/faq-for-visual-creators?hsLang=en#vc-questions)
- [FairConsent App and Platform](https://help.fairpicture.org/support/fairconsent-app-and-platform?hsLang=en#main-content)
- [Subscription & Billing](https://help.fairpicture.org/support/fairconsent-app-and-platform?hsLang=en#subscription-billing)
- [FairConsent Platform](https://help.fairpicture.org/support/fairconsent-app-and-platform?hsLang=en#fairconsent-platform)
- [05 Roles Access and Data Boundaries](https://help.fairpicture.org/support/fairconsent-app-and-platform?hsLang=en#05-roles-access-and-data-boundaries)
- [Updates & Support](https://help.fairpicture.org/support/fairconsent-app-and-platform?hsLang=en#updates-support)
- [06 Risk, Limitations and Warnings](https://help.fairpicture.org/support/fairconsent-app-and-platform?hsLang=en#06-risk-limitations-and-warnings)
- [08 DAM Integrations](https://help.fairpicture.org/support/fairconsent-app-and-platform?hsLang=en#08-dam-integrations)
- [Frequently Asked Questions (FAQ)](https://help.fairpicture.org/support/fairconsent-app-and-platform?hsLang=en#frequently-asked-questions-faq)
- [02 Getting Started](https://help.fairpicture.org/support/fairconsent-app-and-platform?hsLang=en#02-getting-started)
- [04 FairConsent Platform](https://help.fairpicture.org/support/fairconsent-app-and-platform?hsLang=en#04-fairconsent-platform)
- [FairConsent App](https://help.fairpicture.org/support/fairconsent-app-and-platform?hsLang=en#fairconsent-app)
- [01 User Experience Overview](https://help.fairpicture.org/support/fairconsent-app-and-platform?hsLang=en#01-user-experience-overview)
- [07 Consent Links Beta](https://help.fairpicture.org/support/fairconsent-app-and-platform?hsLang=en#07-consent-links-beta)
- [03 FairConsent App](https://help.fairpicture.org/support/fairconsent-app-and-platform?hsLang=en#03-fairconsent-app)
- [Content Production (Creators)](https://help.fairpicture.org/support/content-production-creators?hsLang=en#main-content)
- [Review and payment](https://help.fairpicture.org/support/content-production-creators?hsLang=en#review-and-payment)
- [What we offer and how we work for creators](https://help.fairpicture.org/support/content-production-creators?hsLang=en#what-we-offer-and-how-we-work-for-creators)
- [Getting started on the platform for visual creators](https://help.fairpicture.org/support/content-production-creators?hsLang=en#getting-started-on-the-platform-for-visual-creators)
- [Project organisation](https://help.fairpicture.org/support/content-production-creators?hsLang=en#project-organisation)
- [FairConsent for Fairpicture Projects](https://help.fairpicture.org/support/content-production-creators?hsLang=en#fairconsent-for-fairpicture-projects)
- [Production and post-production](https://help.fairpicture.org/support/content-production-creators?hsLang=en#production-and-post-production)
- [Project brief & deliverables](https://help.fairpicture.org/support/content-production-creators?hsLang=en#project-brief-deliverables)
- [Content Production (Clients)](https://help.fairpicture.org/support/content-production-clients?hsLang=en#main-content)
- [Getting started on the platform for clients](https://help.fairpicture.org/support/content-production-clients?hsLang=en#getting-started-on-the-platform-for-clients)
- [Starting a project](https://help.fairpicture.org/support/content-production-clients?hsLang=en#starting-a-project)
- [Project organisation](https://help.fairpicture.org/support/content-production-clients?hsLang=en#project-organisation)
- [What we offer and how we work](https://help.fairpicture.org/support/content-production-clients?hsLang=en#what-we-offer-and-how-we-work)
- [Project brief](https://help.fairpicture.org/support/content-production-clients?hsLang=en#project-brief)
- [Consent](https://help.fairpicture.org/support/content-production-clients?hsLang=en#consent)
- [Image material](https://help.fairpicture.org/support/content-production-clients?hsLang=en#image-material)
- [Support for Project Managers](https://help.fairpicture.org/support/support-for-project-managers?hsLang=en#main-content)
- [Request and offer](https://help.fairpicture.org/support/support-for-project-managers?hsLang=en#request-and-offer)
- [Consent](https://help.fairpicture.org/support/support-for-project-managers?hsLang=en#consent)
- [Invoice and Payment](https://help.fairpicture.org/support/support-for-project-managers?hsLang=en#invoice-and-payment)
- [Image material](https://help.fairpicture.org/support/support-for-project-managers?hsLang=en#image-material)
- [Production](https://help.fairpicture.org/support/support-for-project-managers?hsLang=en#production)
[](https://fairpicture.org/static/img/fairpicture.svg)
[mailto:email@email.com](mailto:email@email.com)
Copyright © 2026, Fairpicture AG