
Most issues in the field come from setup steps missed before the trip. Once you're in the field, some of these issues are hard to fix. Complete this checklist before you leave so your consents are collected correctly and uploaded to your organization's platform.
Before you leave: 3 things to confirm
- You've accessed into your organization account, not in the personal account.
- Your project already exists, or your admin has given you access to create projects.
- You know that uploaded consents can't be edited, so you'll review each one before uploading.
1. Access your organization account
- Why it matters: consents collected in the personal track can't be uploaded to your organization's platform.
- What to do:
- Check your email for the invitation from your organization and accept it.
- Access the app while you have a good internet connection.
- Check that your organization's name appears on the app and you can see its projects.
- How to tell the difference:
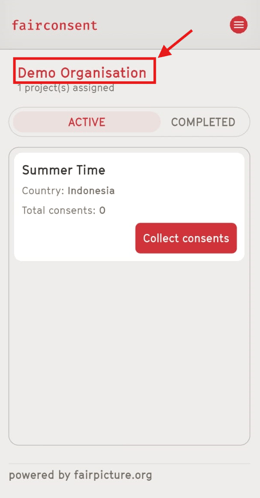
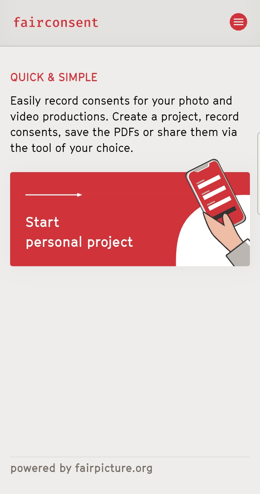
Organization account view Personal track view
- If you don't see your organization: ask your admin to resend the invitation, and make sure it goes to the email address you use to log in.
For admins
- What to do:
- Send invitations to all collectors well before the trip, and check that they've accepted the invitation.
- Create projects in advance, or permit collectors to create them. See How to enable creating projects from the app.
- Share this article with your collectors.
2. Confirm your project is ready
- Why it matters: you can't collect consents unless you have access to a project or you can create a project from the app unless your admin has permitted you.
- What to do:
- Ask your admin whether the project has already been created to assign it to you.
- If you'll need to create projects yourself, confirm with your admin that you have permission. see How to create project from the app.
- How to tell the difference:
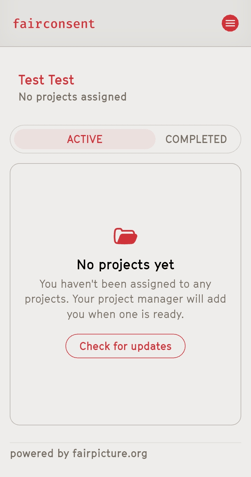
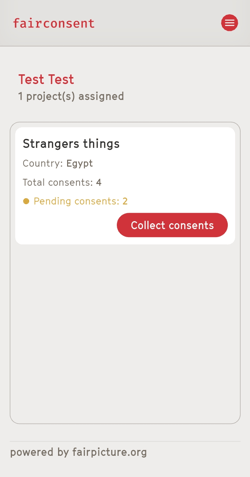
No assigned projects view Assigned project view
3. Confirm which consent terms to use
- Why it matters: your organization may have several consent terms on the platform, and each can be available in more than one language. Using the wrong consent terms or language means the consent giver may not understand or be agreeing to the right conditions. See how to present consent terms to consent givers
- What to do:
- Ask your admin or project lead which consent terms to use for this project.
- If different terms apply in different situations (for example, adults and minors), confirm which terms to use in each case.
- Confirm which language to use for the consent giver you'll meet. If their language isn't available, arrange with your admin to add the proper language of the consent givers.
- Read the terms before the trip, so you can explain them clearly and answer participants' questions.
4. Test the FairConsent app
- What to do: complete a test consent from start to upload before the trip, so you know the full process and in case if there's any issue, you can report it in advance to customersupport@fairpicture.org.
Know how to:
5. Prepare your phone
- What to do:
- Update the app to the latest version.
- Charge your phone fully and/or bring a power bank.
6. Review every consent before uploading
- Why it matters: once a consent is uploaded, it can't be edited.
- Before uploading, check:
- participant name and general info spelling
-
- signature captured
- photo attached
- Need to make a change? See How to edit a consent.
Need help?
- Contact your project lead or customersupport@fairpicture.org.
- If something goes wrong in the field, see Troubleshooting in the Field.
- Alternatively submit a report in the app, tap Menu → Help → Report a problem. See How to Report a Problem in the FairConsent App.